NOTE: This version of the 11 Tools program was the PILOT version for Summer 2010 ONLY. If you are a participant in the Summer 2011 program please click here.
********************************************************************************** Welcome to the SBISD 11 Tools for the 21st Century Learner online professional development program and blog. Currently this program is limited to campus groups and by invitation-only. You should have received information from the SBISD Educational Technology Department regarding your participation in this program. The program has been developed to aid you, a SBISD educator, in learning about emerging technologies that will help you transform your classroom into a learning center for the 21st century students that walk through your door. You will be receiving new classroom technology to use with these tools. The program is contained in this blog and you will work through a series of activities centered around 11 web 2.0 technologies or "tools." You will use links to information on the Internet, video demonstrations, and samples to learn about the 11 tools. You will then be asked to create samples of your own to practice the technology skills involved and to discuss how these technologies will assist you in working with your students in your transformed classroom. As you move through this program, always consider how these tools would fit in your teaching assignment(s) and how you plan to incorporate these tools into teaching and learning. Please view the following 2 videos to get an overview of what a 21st century learner looks like and what a transformed learning environment should look like.
Listed below are 11 tools that you can use in a variety of ways, either individually or in combinations, to bring about change in the way the students in your classroom demonstrate learning. Click on the Tool # and start adding to your toolbox! Tool 1: Creating a blog and registering with the learning community. Tool 2: Building a community of learners and sharing knowledge through comments. Tool 3: Using image generators and mashups. Tool 4: Using cool Google tools to share information. Tool 5: Tagging information. Tool 6: Creating wikis to store and share information. Tool 7: Creating digital stories. Tool 8: Using video resources. Tool 9: Sharing information through Jing & Skype. Tool 10: Exploring Mobile Technology and Apps Tool 11: Practicing good digital citizenship After 11 Tools Reflection At the end of all these activities, you will have an opportunity to reflect on what you have learned and share thoughts and ideas about how this professional development will help bring about change in your classroom. P.S. You can select the Tool links from the side bar on the right as well as this post.
Saturday
Tool 1: Blog Set-up & Registration
A blog is a webpage that is set up in a series of posts which are like entries in a journal. Blogs are a part of the social networking online world, and in the case of blogs used in schools, a part of the larger educational networking online world.
Having students write in blogs (online journals) is a good way for them to share their knowledge with others outside of the classroom. Blogs allow students to have a wider and more authentic audience for their ideas. To quote David Warwick of 2¢ Worth, "students become information artisans instead of merely information consumers."
You will use a blog to record your reactions to the various 11 Tools activities and to post ideas and samples of the tools that you will bring to your classroom for your students to use in learning.
For your Tool #1 Assignment:There are 4 things you need complete for the Tool 1 activity:
When working online, teachers and students often create characters to represent themselves. They often decide to become alter egos or cartoon extensions of themselves. Often times, the act of creating avatars has been described as digital paper dolls. Making avatars are often a way to combine creativity, personality, and a bit of fun while learning a skill. Adding avatars often increase the effectiveness of an online lesson or information posting. They are also useful in situations where it might best if students do not put individual photos of themselves.
There are several sites for avatars. Some are merely pictures while others have motion and voice. You will use the Voki site to create a character, have it make a statement, and add it to your blog.
To complete this task:
You will need to register at the Voki site so you may save your avatar. You can use the same email that you used for your blog.
Create your avatar using the various add-ons like clothing and backgrounds. Be sure you create a message. You can type a message and the site will create a voice. SAVE your avatar so you may capture the code.
Go to the Layout screen of YOUR blog.
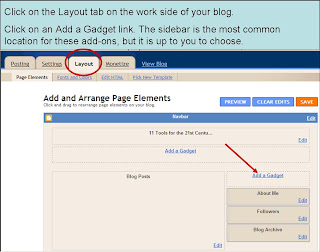
Select the HTML gadget.
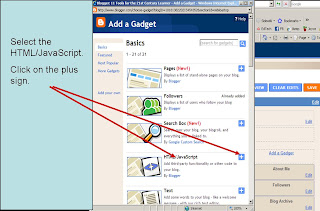
Paste the code and SAVE.
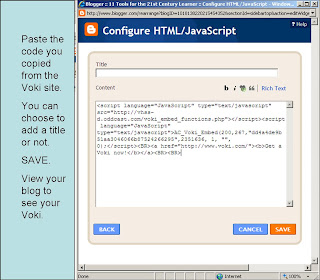
When you go to the public view of your blog, your character should appear where you placed it on your layout screen.
3. WRITE A BRIEF POST on YOUR BLOG ABOUT GETTING STARTED
You will be writing posts about each of the Tools you investigate. For Tool #1, briefly describe the process you just underwent and how you might incorporate blogs in your classroom.
Please include Tool #1 as part of the title of your post.
4. REGISTER YOUR BLOG
You have created a blog. You have created a Voki avatar and uploaded it to an HTML gadget. You have written a short post about your experience with Tool #1.
Now you need to register your blog with the 11 Tools management.
Email vaughn.branom@springbranchisd.com and include the following information:
1. Your name
2. Your campus
3. Your blog's url (address) -- it will look like this http://thepartyouchose.blogspot.com/
4. Your blog's title
5. Your identity in your blog -- you selected this when you created your blog. It could be your name, your initials, an alias you created, or even the same as the title.
Help
You will know your blog is officially registered when you get an email back from the 11 Tools team AND your blog title appears on the list of participating blogs. If you do not receive an email within 3 days of sending the above information, please contact vaughn.branom@springbranchisd.com again.
Tool #1 has been pretty intense. There was a lot to consider in getting started. The rest of the tool investigations should be a little less intense. You will be concentrating on learning about them and how to use them in transforming your classroom and integrating the new technology you are getting.
Enjoy your learning!
Credits:
Common craft video sharing policy
Having students write in blogs (online journals) is a good way for them to share their knowledge with others outside of the classroom. Blogs allow students to have a wider and more authentic audience for their ideas. To quote David Warwick of 2¢ Worth, "students become information artisans instead of merely information consumers."
You will use a blog to record your reactions to the various 11 Tools activities and to post ideas and samples of the tools that you will bring to your classroom for your students to use in learning.
For your Tool #1 Assignment:There are 4 things you need complete for the Tool 1 activity:
- SET UP YOUR BLOG.
- CREATE AN AVATAR
- WRITE A BRIEF POST ABOUT GETTING STARTED
- REGISTER YOUR BLOG with the 11 Tools for 21st Century Learners project management.
1. SET UP YOUR BLOG
1. If you have little experience with blogs, view this video from the Common Craft guy Lee Lefever that explains what a blog is.
2. View these slides for an overview of the key parts of a blog.
Parts of a Blog
Dashboard of a Blog
Post Box of a Blog
3. Because SBISD is going to start using many Google products, these activities will include many of the same items. Therefore, Blogger is the blogging software of choice for 11 Tools.
If you do not already have one, create a Google account and then go to Blogger to set up your blog.
If you already have a Google account, then proceed to Blogger.
4. Blogger has a step-by-step guide for setting up your blog.
5. Things to consider when creating your blog:
- The url (address) of your blog will be unique. The url you create should be short and easy to remember. ALL Blogger blogs urls start http:// and end with blogspot.com
You will create the middle portion.
For example, the url for the 11 Tools blog is http://11tools.blogspot.com/ The "11tools" portion is the unique portion of that url. You can never change the url (address.) - The title of your blog can be different from the url. You can choose a title now for you blog. Later down the road, you can change the title of your blog if its focus changes or if you change how you use it. For example, the title of this blog is 11 Tools for the 21st Century Learner. It can be changed to anything the blog owner wants it to be.
- There is a public side and a working side to your blog. The public side is what the readers see after you have completed your posts in the working side of the blog. Readers will need a link to your blog or the url (address.) YOU will need to remember the email address you used to create your blogger account AND the password you set up so that you can get to the working side of your blog. Put those two pieces of information in a safe and convenient place. You can get to the working side of your blog from your blog's url or any other Blogger blog!
- Blogger has several help features.
- Blogger has a YouTube channel with video tutorials (Caution: some of them may be a bit out-dated)
- Use the SBISD subscription to Atomic Learning which has many video tutorials about Blogger and blogs. (This will require a district-provided login and password.)
2. ADD AN AVATAR TO YOUR BLOG
Now you need to start learning how to add gadgets to your blog.When working online, teachers and students often create characters to represent themselves. They often decide to become alter egos or cartoon extensions of themselves. Often times, the act of creating avatars has been described as digital paper dolls. Making avatars are often a way to combine creativity, personality, and a bit of fun while learning a skill. Adding avatars often increase the effectiveness of an online lesson or information posting. They are also useful in situations where it might best if students do not put individual photos of themselves.
There are several sites for avatars. Some are merely pictures while others have motion and voice. You will use the Voki site to create a character, have it make a statement, and add it to your blog.
To complete this task:
You will need to register at the Voki site so you may save your avatar. You can use the same email that you used for your blog.
Create your avatar using the various add-ons like clothing and backgrounds. Be sure you create a message. You can type a message and the site will create a voice. SAVE your avatar so you may capture the code.
Go to the Layout screen of YOUR blog.

Select the HTML gadget.

Paste the code and SAVE.

When you go to the public view of your blog, your character should appear where you placed it on your layout screen.
3. WRITE A BRIEF POST on YOUR BLOG ABOUT GETTING STARTED
You will be writing posts about each of the Tools you investigate. For Tool #1, briefly describe the process you just underwent and how you might incorporate blogs in your classroom.
Please include Tool #1 as part of the title of your post.
4. REGISTER YOUR BLOG
You have created a blog. You have created a Voki avatar and uploaded it to an HTML gadget. You have written a short post about your experience with Tool #1.
Now you need to register your blog with the 11 Tools management.
Email vaughn.branom@springbranchisd.com and include the following information:
1. Your name
2. Your campus
3. Your blog's url (address) -- it will look like this http://thepartyouchose.blogspot.com/
4. Your blog's title
5. Your identity in your blog -- you selected this when you created your blog. It could be your name, your initials, an alias you created, or even the same as the title.
Help
You will know your blog is officially registered when you get an email back from the 11 Tools team AND your blog title appears on the list of participating blogs. If you do not receive an email within 3 days of sending the above information, please contact vaughn.branom@springbranchisd.com again.
Tool #1 has been pretty intense. There was a lot to consider in getting started. The rest of the tool investigations should be a little less intense. You will be concentrating on learning about them and how to use them in transforming your classroom and integrating the new technology you are getting.
Enjoy your learning!
Credits:
Common craft video sharing policy
Tool 2: Building Community & Comments
 By participating in this online professional development program, you are beginning to create your own personal learning network (PLN.) You are creating a community of learners with whom you share common educational interests and needs.
Will Richardson of Weblogged-ed briefly explains this change in education:
Take a look at some more ideas about PLNs and the changing role of teachers.
One way you have started communicating with your PLN is with your blog. Blogs in being a part of the 2.0 or interactive digital world, are good places to find educators with similar thoughts and ideas.
The posts you write are the first step in the building of your PLN. The second, and equally important step, is for you to comment about ideas presented on other learners' blogs. Comments turn a statement into a conversation.
HOW DO YOU COMMENT?
Here is a list of things to consider when getting ready to comment on the post of another blogger.
Long-time and highly-regarded teacher-blogger, Vicki Davis, aka Cool Cat Teacher, shares her thoughts about how to comment in this post.
As you move through the various activities, select at least five blogs from the 11 Tools community where you will share your thoughts about one of their posts through your comments. The list of participating blogs is located on the right sidebar of the 11 Tools blog.
For your Tool #2 Post in YOUR blog:
1. What are your thoughts about building an online education community and participating in a PLN?
2. What point stood out to you from the commenting advice?
3. What five blogs did you select for your comments? (you may need to come back and add this information later by editing this post.)
See you 'round the learning neighborhood!
Credits:
Image from MS Clip Art
Tool 3: Image Generators & Mashups
 Photo sharing is an important part of the 2.0 interactive world, but it is not always easy to find the right picture to use. It also is hard to know sometimes whether you have the right to use a picture. Flickr is one of the available photo sharing sites on the web.
The Flickr Creative Commons site makes using photos a little easier, and maybe even more fun!
Individuals have uploaded their personal photos and assigned one of six Creative Commons licenses to the photos. By choosing one of the six categories, you and your students will know for sure how you can use the photos you select. You will also have fewer problems with inappropriate photos by using this type of photo sharing site.
The folks that upload their photos add tags (or keywords) that describe what the photos represent. In looking for photos, you will use tags to find photos you want.
When you select photos to use there are a few things to remember:
1. The size of the photo file is important. Very rarely will you want to use the thumbnail size. The file is too small and when it gets stretched, the quality is very poor. On the other side, the largest file size can be a memory hog and make loading slow! The average size of 400-500 dpi is usually a good all-around size file to use.
2. The best format to use in saving pictures is jpg. The next most popular and easiest to use format is png. Try to save photos and other visuals in these two formats.
3. Here is some help in downloading pictures from Flickr Creative Commons and saving them to your computer so you can use them.
Ok, you have found a great place for you and your students to select photos. Now what kinds of things can you do with the photos? What results happen when you mash up two or more pieces of information?
IMAGE GENERATORS & MASHUPS
There are so many sites that allow you to upload pictures and create products with those pictures. Check out these sites and have some fun:
Big Huge Labs
Image Chef
Kid-Friendly Image Generators
Comic Strip Generator
Dumpr
Mappr
Bubblr
Logo Makr - currently not available in district.
iMapFlickr
Flickriver
Spell with Flickr
 How about creating a word cloud?
Wordle
WordItOut
Wordshift
Make a book from Flickr pictures and your own words
Bookr
Make a movie out of pictures, a few words, and some music.
Animoto Help
How about trying a virtual poster or digital bulletin board full of pictures, hot links, and even videos?
Glogster/edu
For your Tool #3 Post in you blog:
1. Choose two different image generators or mashups and create a sample of each.
The samples could represent something important to you personally, classroom-related needs, or ideas for student projects.
If you have used any of these resources, please select two new (for you) choices.
2. Post your samples on you blog. You may add them to your Tool #3 post or your side bar using a gadget. There are directions for saving your creation on each site. Be sure you credit any photos you borrow!
3. Briefly explain how these samples would be used and how they might add to the learning process in your classroom.

Have fun generating your own images!
Tool 4: Cool Google Tools
 Google is more than a search engine. You can do much more than just find information with all the cool Google tools that are available.
 Other than the search engine feature, probably the most well-known Google tool is Google Earth, a mash-up of photographs and maps. It is loaded on your SBISD laptop and other district computers, so you will not have to download it to use it. There are lots of uses for Google Earth.
There are Google images, Google videos, a Google news service and more!
For this Tool experience, the 11 Tools project managers would like for you to concentrate on Google Docs and Google Reader.
In another Tool further down the list, you will have the opportunity to explore Google Sites if you wish.
GOOGLE DOCS
Take this tour to learn more about the Docs and how to use them. The Common Craft video will also quickly explain the value of using them.
This video will give you some insight to using the forms included in Google Docs
Listen to educators who use Google Docs. They describe many ways Google Docs can be used for their professional needs AND for student products!
Atomic Learning contains some videos on creating and using Google Docs if you would like to have more information. (This will require the district-provided login and password.)
GOOGLE READER
The Common Craft guy Lee LeFever explains what a reader is. You will want to create one of these for the 11 Tools blogs you are following and any other online resources that update regularly.
You have probably seen the little orange RSS feed icon on many online resources. RSS or Really Simple Syndication is the means by which you can connect to online resources that consistently update their information, i.e. blogs, newspapers, news services, etc. If you want to learn more about RSS feeds you can start here.
 Your Google Reader will make keeping up with new information really super simple! You will simply subscribe to your choices by adding the url (address) of the site to your reader. Take a short tour of Google Reader.
This video will show you how easy it is to set up your Reader and add blogs and other resources.
For your Tool #4 Post in you blog:
1. Create one document in Google Docs and share it with at least one other person in your PLN. It could a team member, a department colleague, or another teacher with whom you plan a collaboration. It could even be a family member---maybe you are planning a reunion or trip!
2. Set up your Google reader and subscribe to at least five 11 Tools blogs that you will be following. You are welcome to add other subscriptions that you want to follow. Maybe you have hobbies or other interests that you would like to follow.
3. Briefly discuss how you think these 2 Google tools will aid you in your particular classroom or benefit your students in their learning process.
Note:
Please be sure you include Tool # 4 in your post title.
Please hot link any online resources you include in your post.
Images:
Google icon - screenshot created by VWB
Google Earth - screenshot created by VWB
Google Reader - screenshot created by VWB
Tool 5: Tagging and Social Bookmarking
You probably have been bookmarking web sites since shortly after having your first computer put in your hands. With the educational networking that has come about on the web and the need to share information 24/7, bookmarking web sites one computer at a time is no longer efficient and effective.
How many computers do you use the same set of bookmarks? How many different groups are going to access all the information you have found? Social bookmarking to the rescue!
Click here to view the Common Craft video about social bookmarking.
You can build a list of bookmarks, organize them into groups, and update your bookmarks with online services such as delicious and diigo. And you can do all this arranging on one computer and walk over and use the information on any computer!
The key tool in having a well-oiled bookmarking machine is the tag. Tagging your information is like identifying the subjects or key words covered in the information you want to share.

DELICIOUS
On Delicious, you can save and share your bookmarks. You can also see what bookmarks are currently popular on the hotlist. Explore what you can find by doing a search for tags such as education or web2.0. Look what comes up if you search for tools and see how you can narrow your search. Even fun searches for things like frogs and fishing bring up some interesting results. Here is the tag cloud of popular tags .
To join Delicious, you will need a Yahoo ID/account. If you don't already have, it is a simple sign-up. After you sign up, you can explore creating a network or arranging your own tags.
Here is a silent video on how to sign up for delicious.
Here is a silent video on how to set up bookmarks in delicious.
DIIGO
Diigo is another social bookmarking site even more powerful than delicious in what it can do for you and your learning circle.
Look at this video of the basics of diigo. Then take the tour to see the special details in depth.
Click here to see the groups that are available in Diigo. There are over 1300 Education & Schools groups and 240+ k-12 groups, including one about using Diigo in schools. There are many groups about fun things, too, like PaperToys. Go here to see the most popular sites and tags.
To add to Diigo, you will need to register. You can use your Google or Yahoo information.
For your Tool #5 assignment:
1. Browse through both sites and use tags to find two websites new to you. You may choose to find educationally -related items or personal interests.
2. Join one of the sites so that you may add and share information of your choice. Consider joining or even creating a group that fits your needs.
3. In YOUR blog post for Tool #5, include the two webistes you discovered. Be sure to include hot links so that participants can visit them easily. Discuss what tags you used to locate your information. Briefly describe how social bookmarking will be useful in your classroom.
Have a few extra minutes?
This video discusses both delicious and diigo with emphasis on how diigo allows you to highlight and save portions of a webpage and how to set up groups. It is 9 minutes long, but worthy of your time after you have had a chance to get comfortable with the two sites independently.

Are you collecting lots of usernames and passwords for all your tools? Try hard to use the same information as much as possible. You may want to keep a record close by. What about a Google Docs so that you can access the information from any computer?
Credits:
Purple marker photo from FlickrCC by cambodia4kidsorg. Adapted using Jing.
Workman from MS ClipArt
Tool 6: Wikis
You have used a wiki if you have ever been to Wikipedia, the best know wiki on the web!
It is a webpage with special formatting that allows you to collaborate with others while sharing and storing information. You may have already used the SBISD 21st Century Learner Wiki on some of the other assignments and not realized you were in a wiki! Maybe you have had occasion to use the SBISD Curriculum Wiki for other technology learning adventures?
Here is a CommonCraft video that explains what a wiki is.
Oftentimes, you will encounter wikis on the web that look very informal, seem outdated and are abandoned. That it because they were originally meant to be temporary working spaces.
But as with many things on the web, wikis have become more "permanent!" In education, they are very useful for groups of teachers sharing and storing information and great places for students to work together, whether they are across the classroom, the district, the country or the world! Take a look here for classroom ideas for wikis.
Look on the side bar of this blog to see a list of wikis that will show you how wikis can be used. You will notice that there are several wiki sources available for you to use. PBWorks (formerly known as PBWiki) and Wikispaces. They both have free wikis for k-12 audiences and each has it own stong points. Check them out!
Goggle also has a wiki piece called Google Sites.
See if there would be any advantages to using this resource over the other free wiki sources mentioned above.
Here are several tutorials from Atomic Learning that will help you with ideas for a wiki and how to set one up.
For your Tool #6 Assignment:
IN YOUR BLOG post, discuss how students might use wikis to aid in their learning. Did any of the sample wikis you viewed give you any particular ideas for using a wiki in your classroom for students. How about for and your team or department?
Congratulations! You are more than half-way to filling up your toolbox!
Tool 7: Digital Storytelling
Digital storytelling involves using tools from the digital world in order to tell one's story or impart information. Students who create digital stories improve their writing, show creativity and have a voice with many opportunities for an authentic audience that can benefit from or enjoy the students' creations. Another term for digital storytelling is podcast - personal-on-demand broadcast. Watch the Common Craft guy explain the value of podcasting.
Here is an overview of what digital storytelling is using a similar format to the Common Craft videos.
By creating digital stories, students have to locate resources, synthesize information, and pull many things like words, images and even music together to create the final product.
For the purposes of this exercise, you may choose to use PhotoStory on the Dell or I-Movie on the MacBook to create a sample. If you are receiving MacBooks and have not ever made an I-movie, it is highly advised that you create one during this learning session!
Here are some resources about digital storytelling:
Educational Uses of Digital Storytelling
Digital Storytelling Finds Its Way into the Classroom
The Elements of Digital Storytelling
A book review made in PhotoStory.
A second grade group project made in PhotoStory.
An I-movie example about weather
Click here to see two more iMovie examples.
Click here if you would like to see some book trailers middle school students made using iMovie!
For your Tool #7 Assignment:
1. Create a PhotoStory or I-Movie.
These resources are already loaded on to your district-issued computers.
The sample can be something you might use in class, a sample a student might create, or something for you personally.
I-Movie tutorial help. More iMovie help. PhotoStory help. More PhotoStory help. Atomic Learning PhotoStory tutorials (district password required)
2. Include pictures, music, and text and/or voice-over in your digital story.
Each resource has music contained within it, but here are some copy-right friendly free music sources: Incompetech, FreePlayMusic, Soundzabound
You should not use music from CDs you have without getting permission...all that music is copy-right protected!
3. Upload the finished product to your blog. If it is a PhotoStory, be sure you saved it as a finished product--a wmv file or it will not load. If you made an iMovie, it needs to be a mp4 file.
You will use the video icon on the Post Box tool bar.
4. In your blog, write a short post about your experience with digital storytelling. Include how you might have students use digital stories in your classroom.
Ready? Quiet on the set! Action!
Tool 8: Video Resources
Streaming video has become a important resource in the classroom, especially when viewing through video hosting websites like YouTube, TeacherTube, and SchoolTube. Google and Yahoo also host videos.
The traditional news services such as CNN, MSNBC, ABCNews, Fox News and USAToday along with other educational and institutional sites provide current events, science, social studies and other educationally appropriate video resources. To have to go to each individual site for information would be time-consuming and almost impossible because thousands of minutes of video are added each day! Blinkx is a video search engine that brings about 150 video sites together under one search. Many of the videos will be appropriate for the classroom, but it is also possible that Blinkx may pull up things that are blocked because of content. As with any resource, these choices should be previewed and planned appropriately ahead of time.
Hulu is another resource for video that may be useful in the classroom. It stores many current television programs and movies, plus classic reruns. Several channels like Green (including National Geo environmental topics), Business, and News & Info (which includes Nova and Biography) could be sources for helpful clips. Alfred Hitchcock short stories are included in the Classics collection.
Hot links are essential to the 2.0 online world. Being able to go directly to additional information by clicking on a hot link is one advantage of the technology over print resources. Embedding information like a video brings information a step closer to immediate use. Embedding a video involves copying some computer code and pasting it on the Html page versus typing text on the compose page of your blog.
For your Tool #8 Assignment:
1. Select two videos that may be useful resources in your classroom. Upload them to your blog if they can be embedded into your blog. If they do not have embed capabilities, hot link them to your blog.
2. In your blog post for Tool #8, discuss how videos are useful resources for your students and how the 2 videos you selected will add to the learning in your classroom.
3. If it is not clear from the format, be sure and include the titles and indicate from which source you got the videos so that others may go there for additional information. Example: YouTube videos are easily recognizable and include the title of the video, but other sources listed here may be not be clearly identified.
Tool 9: Sharing Information Through Jing & Skype
A benefit of the 2.0 online world is how easy it is to share information. One way of sharing is by capturing what is on the screen and using the captured information to help explain something. Screen captures are particularly useful in the classroom for making visually enhanced directions.
 Jing is a free program that allows you to easily add visuals to your online conversations. It allows you to capture a single screen or make a movie of several screens. The finished product can easily be stored and shared in Screencast , another free service, or shared other ways. Here is some information about how Jing can be used in classrooms and for other school-related needs.
Click on this link and then click on "Watch a Video on How" Jing works. It discusses both the free and pro (pay-for) versions, but you should be able to get the general idea of what you can do with the free portion. You will need to download Jing to be able to use it.
 Another way to share information online is with Skype. You can chat online for free with Skype-to-Skype calls and either have an audio only encounter or have a video conference if you have a camera. The district Dells require the purchase of a minicam, but the MacBooks have a built-in camera. Another tool that will improve your Skype experience is a headset. The quality of the conversation will be improved, but Skype will work without a headset.
Information you need to use Skype:
Download the program. When you downoad, you will be asked to create your Skype name. You will have a Skype icon on your desktop. You click that to initiate a call.
How do I make a call? For the call to be free, each person must have a Skype account. Each person must download the program.
Here are the Essentials of Communicating with Skype
1. Discuss how the screencast could help your students and how you might have students use Jing.
2. Discuss how you might use Skype with your students and share across the district, the state, the nation, or the world!
OPTIONAL: 3. If you did create a screecast with Jing or Skyped with someone, tell a little about the experience.

Bet your tool box is getting heavy by now!
 Jing is a free program that allows you to easily add visuals to your online conversations. It allows you to capture a single screen or make a movie of several screens. The finished product can easily be stored and shared in Screencast , another free service, or shared other ways. Here is some information about how Jing can be used in classrooms and for other school-related needs.
Click on this link and then click on "Watch a Video on How" Jing works. It discusses both the free and pro (pay-for) versions, but you should be able to get the general idea of what you can do with the free portion. You will need to download Jing to be able to use it.
 Another way to share information online is with Skype. You can chat online for free with Skype-to-Skype calls and either have an audio only encounter or have a video conference if you have a camera. The district Dells require the purchase of a minicam, but the MacBooks have a built-in camera. Another tool that will improve your Skype experience is a headset. The quality of the conversation will be improved, but Skype will work without a headset.
Information you need to use Skype:
Download the program. When you downoad, you will be asked to create your Skype name. You will have a Skype icon on your desktop. You click that to initiate a call.
How do I make a call? For the call to be free, each person must have a Skype account. Each person must download the program.
Here are the Essentials of Communicating with Skype
- How to Dowload Skype
- How to Get Started
- How to Set up Skype Name & Password
- How to Set up a Profile
- How to Initiate a Call
You have examined how to set Skype up and use it. Why would you use it in a classroom?
- Using Skype at School
- 50 Awesome Ways to Use Skype in School - pay particular attention to how you can find other educators interested in sharing a Skype adventure with your class.
1. Discuss how the screencast could help your students and how you might have students use Jing.
2. Discuss how you might use Skype with your students and share across the district, the state, the nation, or the world!
OPTIONAL: 3. If you did create a screecast with Jing or Skyped with someone, tell a little about the experience.

Bet your tool box is getting heavy by now!
Tool 10: Exploring Mobile Technology And Apps
 The iTouch, the iPhone, and the newest member of the Apple family, the iPad represent the mobile devices part of the digital world. They allow for on-the-go learning. You add apps (or applications) to the device in order to use it. Apps are software created for the specific device.
This will be a slightly different Tool in that it involves using some hardware to which you may not have easy access. If you do not have an iTouch, an iPhone, or an iPad, try to borrow one or maybe go to the nearest Apple Store and actually play with the samples on display for awhile. If you can't visit the store or borrow one, that's ok! You can just read about the devices and the many apps available.
If you have an iTouch, an iPhone or iPad then you will probably have already done these things and will be able to teach us in your post.
 Click the following links to learn more about these devices and the many, many apps that you can add to them.
Why an iTouch in Education
Learning in Hand - iTouch
Top 50 FREE Educational Apps
Great ITouch Apps for Primary Students - these are not free apps
Apple has a very extensive list of apps, not all free, for you to browse and get ideas!
Here is a list of free apps collected in SBISD that are appropriate on school iTouchs.
These four 1-1.5 minute YouTube videos will let you see some kids reviewing apps. iTouchs in school 1, 2, 3, 4
For your tool #10 assignment on YOUR blog:
1. Discuss some of the free educational apps you revewed.
2. OPTIONAL: If you had an opportunity to play with one of the devices, briefly describe your experience. Was there a WOW moment?
3.. Discuss ways your students could use the iTouch or iPad and appropriate apps in your class.
Ok, go give those thumbs a good workout!
Credits:
Mosaic photo created from LIS Bond Tech photos
Tool 11: Digital Citizenship
Digital citizenship has become an essential ingredient in the learning process of 21st century learners. Just like they are taught to "stop, drop, and roll" at the annual visit from the local fire department or learn the meaning behind the Bill of Rights to the Constitution, learners needing to know how to operate in the digital world is just as important...and a role in which the school must participate. The ages of the learners will determine the information needed and how to provide appropriate digital world experiences. Providing a rich (and safe) learning environment in the digital world is just as important as it is on the bricks and mortar side!
SBISD Educational Technology has information about digital citizenship for you to use. A list of resources can be found here in grade level categories. Information from BrainPop is included.
Atomic Learning has some tutorials that will help you formulate thoughts about what digital citizenship(75096) and technology literacy (75097) mean and encompass. They are found under 21st Century Skills where you may want to choose to look at some other short tutorials.
 Some other resources that will give background and ideas on how to present the topic include:
1. One approach to digital citizenship resides at the Digiteen Digital Citizenship Wiki. Delve into the topics in the left margin. These topic titles come from the book 'Digital Citizenship in Schools' by Mike Ribble and Gerald Bailey.
2. Cool Cat Teacher summarizes much about digital citizenship.
3. Another teacher "reflects" on digital literacy.
4. Here is a Ning with resources for educators on digital citizenship.
5. The ISTE standards (NETS-S [for students]) talk about digital citizenship. And the NETS-T for teachers give a little more detail about digital citizenship.
6. I-Safe factsheet from TxSSC (Texas School Safety Center). Check out the TxSSC for many more resources including the link to TEA's Internet safety page.
For your Tool #11 assignment:
In YOUR blog post, discuss at least three things you would want to make sure your students understand about being good digital citizens. Explain briefly how you would "teach" the idea of digital citizenship to your students.
You have done it - your toolbox should be full!
Go here to complete the After 11 Tools Reflections
Credits:
Photo mosaic - photos from LIS Bond Tech Collection - sign from Sign Generators
After 11 Tools: Reflections
 Congratulations on filling up your toolbox with lots of great learning resources to use in your transformed 21st century classroom!
For your final 11 Tools post, answer these questions:
1. What are your favorite tools you now have in your personal technology toolbox? Briefly describe a particular activity that you will plan for your students using at least one of these new tools.
2. How have you transfomed your thinking about the learning that will take place in your classroom?
3. Were there any unexpected outcomes from this program that surprised you?
To finish up your credit:
Atomic Learning,which you have used for help in some of the "Tools", is a great resource for training in 21st Century Literacy Skills and can help you move forward with your understanding of 21st Century Literacy. It has numerous 21st century projects and skills learning opportunities.
To get yourself started, take the assigned self-assessment on 21st Century Skills. This assesment covers a broad variety of topics and skills that are necessary for 21st century literacy. It covers topics not included in 11 Tools and may challenge you. YOUR SCORE IS NOT IMPORTANT. For 11 Tools credit, you ONLY need to complete the ASSESSMENT - NOT the Pathway.
Log into Atomic Learning. You already have a subscription. You do not have pay anything! If you do not remember how to sign in, contact karen.justl@springbranchisd.com for the sign in information.
Once logged in, expand My Training to view Assessments.
Once logged in, expand My Training to view Assessments.
Expand Assessments to view the 21st Century Skills Assessment – 11 Tools.
The assessment takes about 15 minutes. You can stop and resume if you are interrupted.
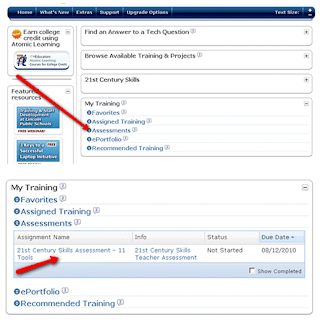 Upon completion, you will receive feedback on your areas of strength as well as a certificate. Additionally, Atomic Learning will develop a training pathway for you to strengthen areas of weakness and help you continue your learning. That pathway will appear in the Assigned Training section of your profile in Atomic Learning for you to return to and complete as you have time. Remember you can complete Atomic Learning trainings for Spring Branch professional development credit.
You’ll be happy to see the progress you’ve made on your path to 21st Century Literacy! !
The assessment takes about 15 minutes. You can stop and resume if you are interrupted.
Upon completion, you will receive feedback on your areas of strength as well as a certificate. Additionally, Atomic Learning will develop a training pathway for you to strengthen areas of weakness and help you continue your learning. That pathway will appear in the Assigned Training section of your profile in Atomic Learning for you to return to and complete as you have time. Remember you can complete Atomic Learning trainings for Spring Branch professional development credit.You’ll be happy to see the progress you’ve made on your path to 21st Century Literacy! !
Subscribe to:
Posts (Atom)